YT-1000 ramp

YT-1000 ramp

Friday 28 September 2012

YT-1000 Part 1 Shaping the YT-1000

Hello, this series of posts will follow my YT-1000 Corellian freighter build.
Probably my favorite thing about Star Wars are the model space ships, I love how they don't look like the old school type space ships but somehow they look exactly what a space ship should look like. Searching for reference I came across a couple model builders.

The Model shop with Lasse Henning shows the work of Lasse Hennings and how he builds studio scale model ships. His work was the first I came across and my main inspiration, his work is amazing. More of his work can also be seen here. Lasse Henning

Modelers, Miniatures and Magic highlights the work of several model makers. I've spent a lot of time going over the images on these sites and am using them as reference for my build. More here.

I also followed this incredible build on the Resin Illuminati site. 
And found this site to be very helpful too Renderosity

Many of the modelers will build an exact replica of the Millennium Falcon right down to every detail. To the point of buying a model Porsch just for the transmission. I have no interest in going to all that trouble. I want to build my own one of a kind model. Like Lasse, I want to experience what it was like for the Star Wars modelers to build a space ship for the first time using what ever is available to me.

Now I am not, nor will I likely ever build a Millennium Falcon, because if I do, it would have to look just like the Falcon with every greeblie (a greeblie or greeble is the name given to all the little mechanical bits added to the model. No one knows what their true function is as it's all made up, so the word greeble is used, i prefer greeble, pronounced gree-bull.)

For Christmas last year I got the Haynes Manual for the Millennium Falcon and in it was a drawing for a YT-1000. The Falcon is a YT-1300, so the YT-1000 is an earlier model. And since I found no one has posted any images of one, I thought it would be a good model to build. It's similar enough to the Falcon, but different. However the drawings only included a top and side view.


I had the plans printed to the size I wanted, total length 16 inches. Not a lot of detail on the plans but enough to get me going.
After thinking about how I would start, I decided I would vacuum form most of the shapes. This turned out to be an ideal way to go for me. The forms were cut from MDF (medium density fiberboard) which is commonly used in cabinet making and available at any lumber yard. It's light weight and very easy to cut.

The dome was formed on a woodworking lathe.


 The engine cover.
Top and bottom cap and the corridor.
The dome.


Once all the parts were formed and trimmed, they were temporarily held in place using masking tape.
When I was happy with the location and that all was good, I glued them in place.
The top and bottom domes are not yet connected. This makes it easier to work inside if I have to.


I needed to build the landing gear so I could build the bays that they would sit in. This was important as I needed to cut into the hull and have the model sit level. And all this would have been very difficult to do later.
These are temporary landing gear, the final ones will be better.
And the disc part is upside down, not sure how I missed that! Oh well the new ones will be correct.


Here the cockpit is mocked up and one of the Mandibles is in place.
Two short pieces of 2 inch ABS pipe were cut to fit around the back end of the ship. These had to be in perfect alignment with each other and the horizontal axis of the ship. I spent quite a bit of time on this, I ended up building a jig to hold them in place while I fitted them with Bondo.


The final shape of an engine.


The cockpit was made by wrapping .5mm styrene 3 times around a conical shape that I cut on my lathe. The styrene was glued to itself as it was wrapped. Then the windows were carefully cut out.

Thursday 27 September 2012

Shop talk

Just thought I'd start a post about shop tools, supplies and techniques.
I've been building stuff for about 25 years and have learned a few things. So when I set up shop in our house I knew what I wanted and what I needed.


Here's a couple pics of the workshop in the front end of my garage.
It's not huge, just 12 feet by 8 feet. But I've managed to cram some useful stuff into it.
And trust me, the shop was a mess 10 minutes after I took this picture.


Yes, that's my MGB, I still have it. 


This has been a VERY handy item in my shop lately. It's just a pressure sprayer that a friend gave me. I removed the sprayer parts and cleaned it up to use as a pressure tank. When I'm molding or casting model parts, I place them in the tank and hook it up to my air compressor. It works to compress any bubbles in the mold or cast and it works like a charm. I have had flawless results with this item. If you are doing any molding and casting I highly recommend you get one. In fact it works too well sometimes, pushing the rubber into places I didn't think it could get. Visit my Corellian Freighter post to see the results.


Here's another handy item I bought from Micro-Mark. This lathe is very easy to use and is great for making some pretty neat things. You can buy lots of accessories like bits and bit holders that make it very versatile. With it I've made the engines and docking rings for my Corellian Freighter model.


For the most part my tools aren't expensive or fancy. The bandsaw and drill press are from Home Depot and Canadian Tire, both were under $100 (on sale). I found the sander slightly used and I look for sales on other tools as well. 
I've been using Smooth-On molding and casting supplies, and I bought several 4x8 sheets of styrene of various thicknesses from a supplier in Vancouver.


I searched the internet for some instruction on building a vacuum former and came across a couple modelers who just use a simple homemade job. This is my former, only 16 inches square and it works great. I'm using a shop vacuum and a patio heater.


This is the set up outside, because styrene smells really bad when heated, and you DO NOT want to do this in your house.
The black box on the left is a tin foil lined oven made from some MDF. The patio heater sits inside and heats the styrene up very evenly.


The insides of the former are sloped to help the air flow easily out. I've seen a lot of much fancier machines with air pumps and hydraulic this and levers for that and unless you're going into production and working at it for hours on end, great, but this is all you need for small projects.
I have a set of frames that reduce the working area down so I can form small parts and I don't always have to use a 16x16 piece of styrene. Less waste.


Some samples what the vacuum former can do.
The domes for the Corellian Freighter were formed of 1.5mm styrene.
Yes it's a sad face. But no!
More space ship parts.


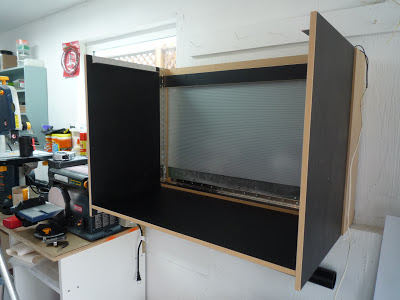
I don't have much room left for a spray booth so I built a transforming spray booth. Normally it just looks like a medicine cabinet.
But open up one side.
Then the other and lower the work surface.
Raise the top and clamp it in place, and now I have a spray booth.


Inside is a squirrel fan, not super powerful but better than nothing. It vents out a nearby window.


That's all for now, come back later to see more on Shop Talk!.


Monday 24 September 2012

Models

Here are just some of the models I've built over the past few years.


I used to own this truck back in Regina, it's a 1946 Chevrolet 3/4 ton that I bought for $500. The farmer and I were trying to get it started but without any luck. Suddenly the engine ran for about 5 seconds then quit. It was enough time for me to know that it would live. I spent several months rebuilding the carburetor and brakes. The first time I drove it the stick shift came out of the floor, and I almost hit a small compact car. Anyway I finally got all the bugs out and drove it for several years. 


A few years ago I bought a model kit of the same truck and modified it to look like my old truck. I cut the running boards and built a box and hoist to match the real truck.


The same truck was used during World War II in the deserts of Africa under the name LRDG or Long Range Desert Group. I ordered a model of that vehicle, built it and added some extra details.


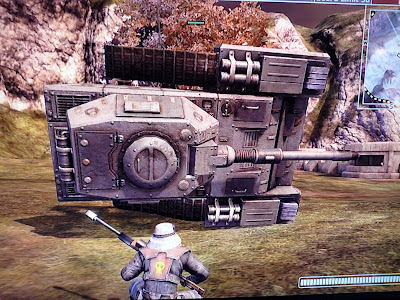
When I built my model tank I used the video game of course as reference, taking photo's off my TV.


I would use one of the airplanes in the game to flip the tank over onto it's side or upside down to get a good view.


I finished the model a few years ago but never got around to finish the paint job to make it grimy.


Sunday 23 September 2012

YT-1000 Corellian Freighter model build

I'm currently working on this project and it's a lot of fun. For those of you that don't know what a YT-1000 is, well it's an earlier model of the Millennium Falcon.
This is the drawing I'm using to build it and it's pretty much all I have to go on. I am however using photo's of the Millennium Falcon as reference for the general look of the model.

I found this ship in the Haynes Manual for the Corellian Freighter YT-1300 (Millennium Falcon). The YT-1000 is smaller than the YT-1300 as seen in this diagram.
       YT-1300                           YT-1000


This model is all scratch built using sheet styrene and spare model parts.
Here are some photo's of my work so far.
some armor plating and the first greebles

The original engine, the mold and two casts.

The main parts were vacuum formed.

Laying out the bottom side.
Scratch built landing gear.
(the disk part is upside down, it must have been a late night)


Two cast docking rings.
You can see more of this project on other posts called YT-1000 parts 1, 2, 3 etc.